I love a beauty bargain! Especially when the bargain comes from a company, like e.l.f. Cosmetics, that produces inexpensive products without compromising product quality. I love the e.l.f. Cosmetics eyeliners and blushes. So when I found out that e.l.f. Cosmetics has baked highlighters, I jumped right on board. These highlighters sell out pretty fast so they must be really good, right?
My first impression of the highlighter I bought, which was Blush Gems ($3.00) was well...meh. The payoff wasn't fantastic and to be honest looked like I did not have any highlighter on. I found it difficult to get enough product on my cosmetic brush and it required too much effort to continuously swirl the brush in the product, then apply onto the high points of my cheeks, and repeat the same process over the areas I thought I just covered.
I hate discarding cosmetics, even if it just cost me $3.00. So I gave it the old college try and worked at the highlighter again. Check out this easy step out to decide if the e.l.f. baked highlighter is worth another try or a toss:
1. Use your finger rather than a brush. I know it sounds strange. But your fingers have a lot of ridges, grooves, and oil that pick up pigment better than a brush can.
2. Wet your finger and then press into the highlighter. This is a baked highlighter, which means it can be applied on wet and wet actually increases the intensity. Once you have picked up enough product with your wet finger apply to the high-points on your face.
So Toss or Try Again? My verdict: try again. It actually works out much better using a damp finger application. Let me know what your verdict is!
Showing posts with label tips. Show all posts
Tuesday, October 25, 2016
Thursday, March 12, 2015
Product Review - Mary Kay NouriShine Plus Lip Gloss in Sparkle Berry
Mary Kay Cosmetics is offering new and limited shades of their NouriShine Plus Lip Gloss Line. Just looking at the new catalog, we could not resist trying out the
Mary Kary NouriShine Plus Lip Gloss in Sparkle Berry. The NouriShine Gloss goes on super smooth and quenches dry lips. The intense berry color provides ample coverage and can be worn without the need for reapplying for 8 hours. Overall, we really liked the hue of the new limited edition. It provides a great wine color with a little glitz (all thanks to the shimmer) that transitions well from winter into the spring. We would also consider wearing this color in the Fall. Sparkle Berry also pairs well with the new Pantone Summer color--Marsala. This also goes well with a blue blouse, particularly turquoise. For those who may be a little color shy, you can either apply half the amount of Sparkle Berry to your lips or blot some of the excess away. Sparkle Berry is available online or thorough your Mary Kay consultant for $14.00 (0.15 fl oz).
Wednesday, March 4, 2015
How to Wear a Sultry Eye
Want an easy to transition work to night out eye scheme? We like the sultry eye. The sultry eye uses a subtle, neutral palette and does not overwhelm. It is easy to touch up and is soft and sophisticated. We like using greys and tans for this look. Try the following out this week for a classic and timeless style.
How to Wear the Sultry Eye
1. Prep Eyelids.
Using a pea size dot, gently blot on eye primer on eyelids and brow bone. In order to blend the primer on seamlessly, use your ring finger. We like Urban Decay's anti-aging eye primer, cost $24.
2. Apply Eyelid Color.
3. Apply Brow Bone Color.
Swipe a neutral tan eyeshadow onto the brow bone. Blend into the crease. We like Smashbox's creamy matte beige (Full Exposure Palette; cost $22.00).
4. Finish the rest of the eyelid.
Swipe a medium shade of tan on the remaining 1/4 of the eyelid. Blend into the rest of the eyelid color. Use Cashmere Bunny by Too Faced (included in the Natural Eye Palette; cost $ 36.00).
5. Apply color to the crease.
Blend a light brown into the eye crease. We like Urban Decay's eyeshadow in Bust (cost $18).
6. Rim eyelids in dark brown.
Using an eyeliner brush, line eyes in a dark brown shade. Try it in Sexpresso by Too Faced (also in the Natural Eye Palette from step 4).
7. Apply pearl to corners of eyes.
To the corner of the eyes, gently apply a pearl or white glitter eyeshadow. Just a dab will do. This will draw attention to your face and give you a wide-eyed look. We use Urban Decay's eyeshadow in Zephyr (cost is $18).
8. Final Step! Mascara.
Coat eyelashes once or twice using Cover Girl's Lash Blast Mascara in Very Black (cost $6.23).
Monday, January 5, 2015
How to Do a Pedicure in the Comfort of Your Home
We can't count how many times we would love a pedicure when we come home from work. Try an at home pedicure to save on money in between professional ones and quiet those puppies! Here are a few tips to get you started:
1. Prep Feet
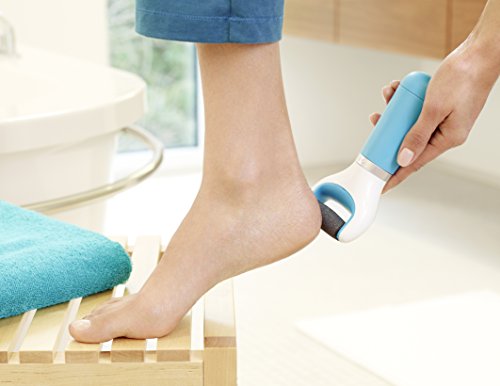
Remove dry skin, yellow spots, and calluses from the soles of your feet with a foot file. We like the Amope Pedi Perfect Electronic Pedicure Foot File and Callus Remover (cost $39.99). Be sure to place a towel underneath your feet to collect dry skin and avoid a mess.
2. Soften feet
Soften and soothe by messaging foot softener all over your feet. Rinse off with warm water. Try Blue Goo-Cracked Heel Foot Softener with Emu Oil and Beeswax (cost $3.99) or Lemony Flutter by LUSH (cost $16.95).
3. Slough off dead skin cells
Use a pumice based foot scrub to get the tops of your feet super soft. Rub gently into the tops of your feet and rinse with warm water. Check out Peppermint Cooling Pumice Foot Scrub (cost $8.40).
4. Soak feet (optional)
If you have time, take a load off and soak your feet in a nice, warm foot bath. During step 2, turn on your foot bath, like the Conair True Messaging Foot Bath with Bubbles and Heat (cost $ 36.12), and add one half of a bath bomb. Try the Butterball bath bomb (cost $4.95) to soothe. Relax feet in bath for 30 min.
5. Moisturize feet.
Dry off feet from the bath. Message a nice foot lotion into feet. We like LUSH's Fair Trade Foot Lotion (cost $23.95). This pink beauty smells like peppermint and makes sore feet feel cool.
6. Buff toenails and treat cuticles.
Prep toenails for nail polish. We like the SEACRET Nail Care Collection Kit (cost $ 49.95). Although this set is labeled for hands, we find that it works amazing on feet as well. Use the nail file to smooth out the ends of toenails. The buffing board can be used to smooth out the tops of nails and to create a shiny finish. Apply cuticle oil on the base of toenails and work into the nail bed. You now have glamours looking toenails!
7. Paint on your favorite nail polish.
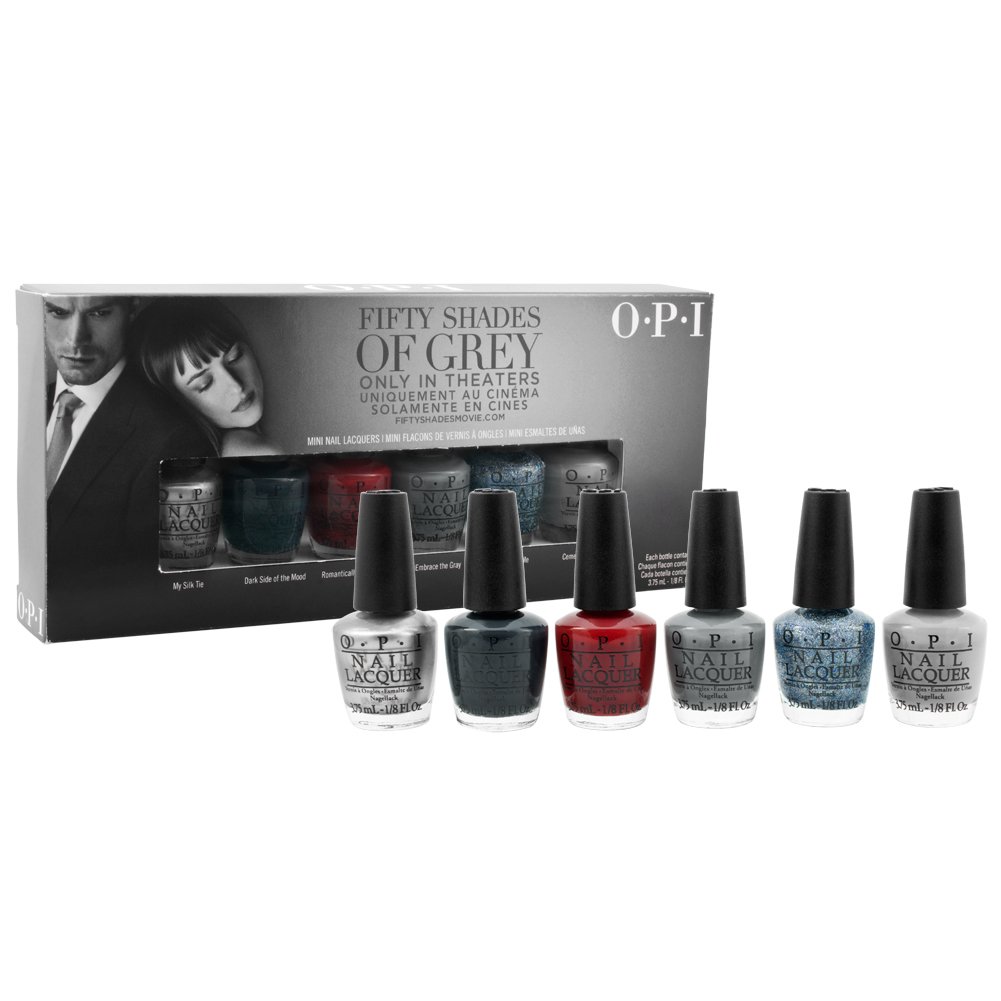
You may not want to since your toenails will look fantastic from the kit described in step 6. In case you are in the mood to flash your puppies around, start with a natural base coat, let dry for 3 min and then apply your favorite color. New colors we are excited for this month are the OPI Collection of 50 Shades of Grey (cost $14.50). Finish your nail treatment with a layer of top coat.
8. Take a pedi selfie and admire!
1. Prep Feet
Remove dry skin, yellow spots, and calluses from the soles of your feet with a foot file. We like the Amope Pedi Perfect Electronic Pedicure Foot File and Callus Remover (cost $39.99). Be sure to place a towel underneath your feet to collect dry skin and avoid a mess.
2. Soften feet
Soften and soothe by messaging foot softener all over your feet. Rinse off with warm water. Try Blue Goo-Cracked Heel Foot Softener with Emu Oil and Beeswax (cost $3.99) or Lemony Flutter by LUSH (cost $16.95).
3. Slough off dead skin cells
Use a pumice based foot scrub to get the tops of your feet super soft. Rub gently into the tops of your feet and rinse with warm water. Check out Peppermint Cooling Pumice Foot Scrub (cost $8.40).
4. Soak feet (optional)
If you have time, take a load off and soak your feet in a nice, warm foot bath. During step 2, turn on your foot bath, like the Conair True Messaging Foot Bath with Bubbles and Heat (cost $ 36.12), and add one half of a bath bomb. Try the Butterball bath bomb (cost $4.95) to soothe. Relax feet in bath for 30 min.
5. Moisturize feet.
Dry off feet from the bath. Message a nice foot lotion into feet. We like LUSH's Fair Trade Foot Lotion (cost $23.95). This pink beauty smells like peppermint and makes sore feet feel cool.
6. Buff toenails and treat cuticles.
Prep toenails for nail polish. We like the SEACRET Nail Care Collection Kit (cost $ 49.95). Although this set is labeled for hands, we find that it works amazing on feet as well. Use the nail file to smooth out the ends of toenails. The buffing board can be used to smooth out the tops of nails and to create a shiny finish. Apply cuticle oil on the base of toenails and work into the nail bed. You now have glamours looking toenails!
7. Paint on your favorite nail polish.
You may not want to since your toenails will look fantastic from the kit described in step 6. In case you are in the mood to flash your puppies around, start with a natural base coat, let dry for 3 min and then apply your favorite color. New colors we are excited for this month are the OPI Collection of 50 Shades of Grey (cost $14.50). Finish your nail treatment with a layer of top coat.
8. Take a pedi selfie and admire!
Subscribe to:
Posts (Atom)